Biology Together · Unit 3: What plants need and how they work
Thirsty Celery
You stand celery stalks in strongly coloured water and check them over a day. Your child watches colour climb the stalk into the leaves, then sees the cut end dotted with colour where the water tubes are, and compares a stalk with leaves to one without.
Watch first Set Up: Thirsty Celery · 0:42
Read the transcript of “Set Up: Thirsty Celery”
Film transcript: Set Up: Thirsty Celery
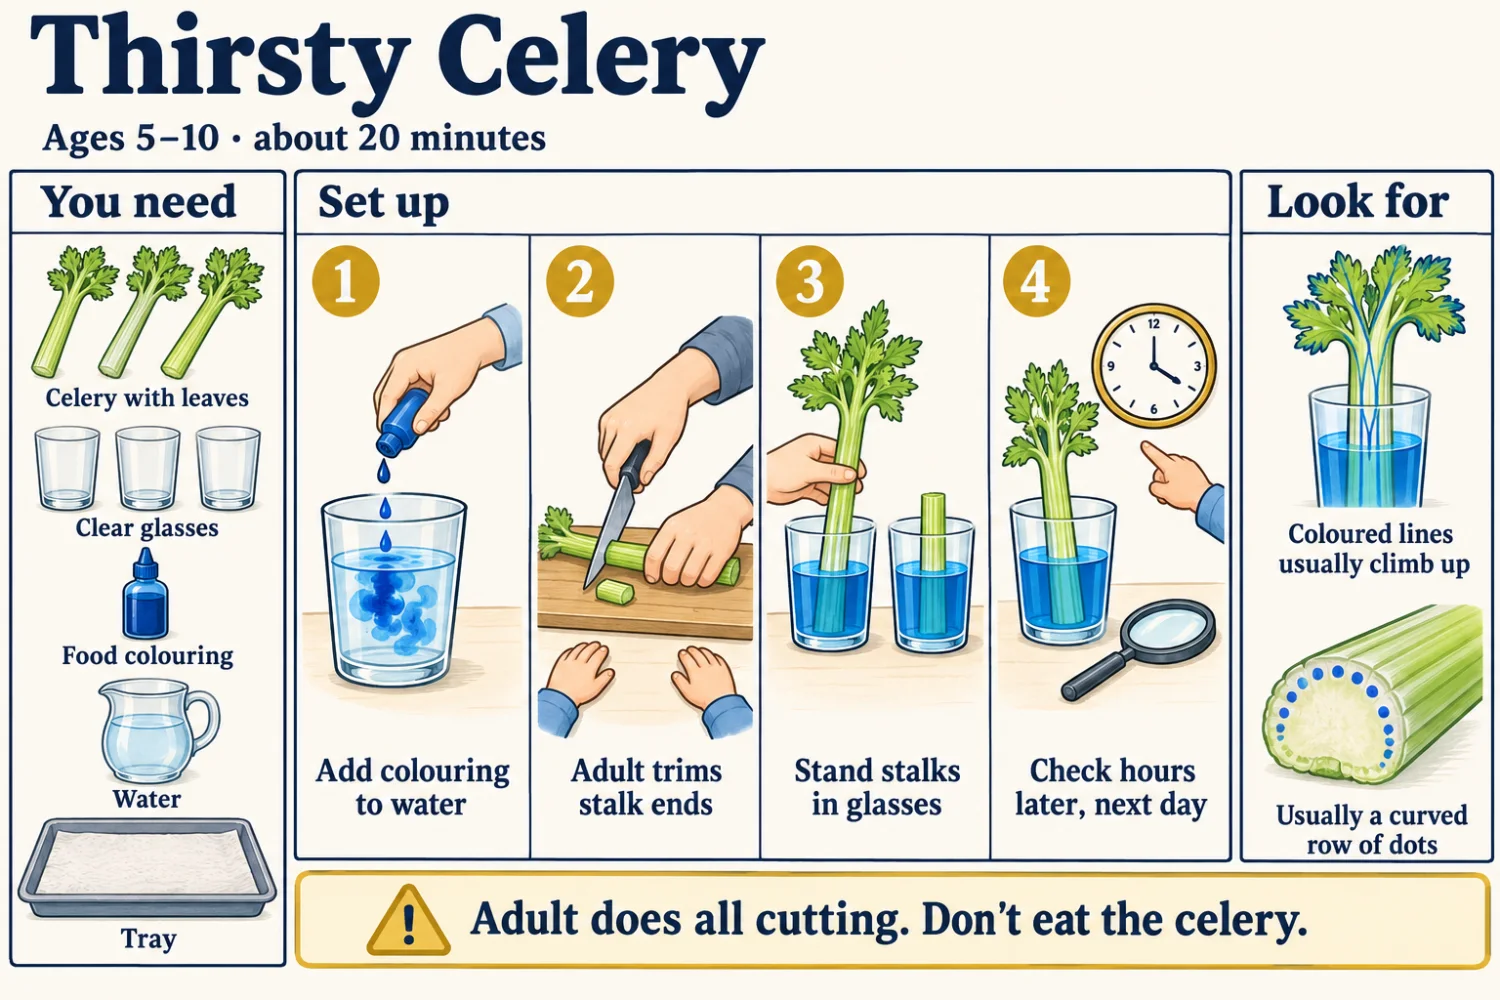
You need three celery stalks with leaves, three clear glasses, and blue or red food colouring. Fill each glass with about five centimetres of water. Stir in 15 to 20 drops of colouring per glass. An adult trims the bottom of each stalk. Stand them in a bright spot, out of direct sun. Check after about four hours. Most often, coloured lines show along the stalk. Overnight usually gives the clearest result, and the cut end shows a row of coloured dots. Stay nearby while the coloured water is out. An adult does all the cutting.
Before you start
- Hands-on time
- About 20 minutes, plus short checks after about 1 hour, 4 hours and the next day
- Where
- Indoors
- Ages
- 5 to 10, with an easier and a harder version below
- Grown-up
- An adult does all the cutting. Stay nearby while the coloured water is out; the checks later are quick looks together.
What you need
- 3 celery stalks with leaves still on (the pale inner stalks often have the most leaves)
- 3 clear glasses or jars that won't tip easily
- Blue or red food colouring (yellow is hard to see)
- Water
- A knife and cutting board, for the adult
- A tray, paper towels, and old clothes
- A magnifying glass (optional)
- A white carnation or a leaf of napa cabbage (optional)
- Paper and a pencil, or the printed observation sheet below
Virginia science standards SOL 1.4 bSOL 4.2 b
The big idea
Stand a celery stalk in blue water and wait. After a few hours, thin blue lines creep up the stalk and the leaves start to turn blue at the edges. The colour shows a path your child can’t normally see: the water tubes inside a plant.
Roots take in water, and the stem carries it up to the leaves. Inside are bundles of tiny tubes, too thin to see one by one. Water moves up them, and food colouring rides along. The celery stalk we buy is really the long stalk of a leaf, but it carries water the same way a stem does.
Leaves matter here. Water evaporates from tiny pores in the leaves, and as it leaves, it pulls more water up the tubes behind it. That is why a stalk with leaves usually takes up colour faster than one without. Virginia’s grade 1 standard asks what stems and leaves do; grade 4 adds how roots, stems and leaves work together.
What to do
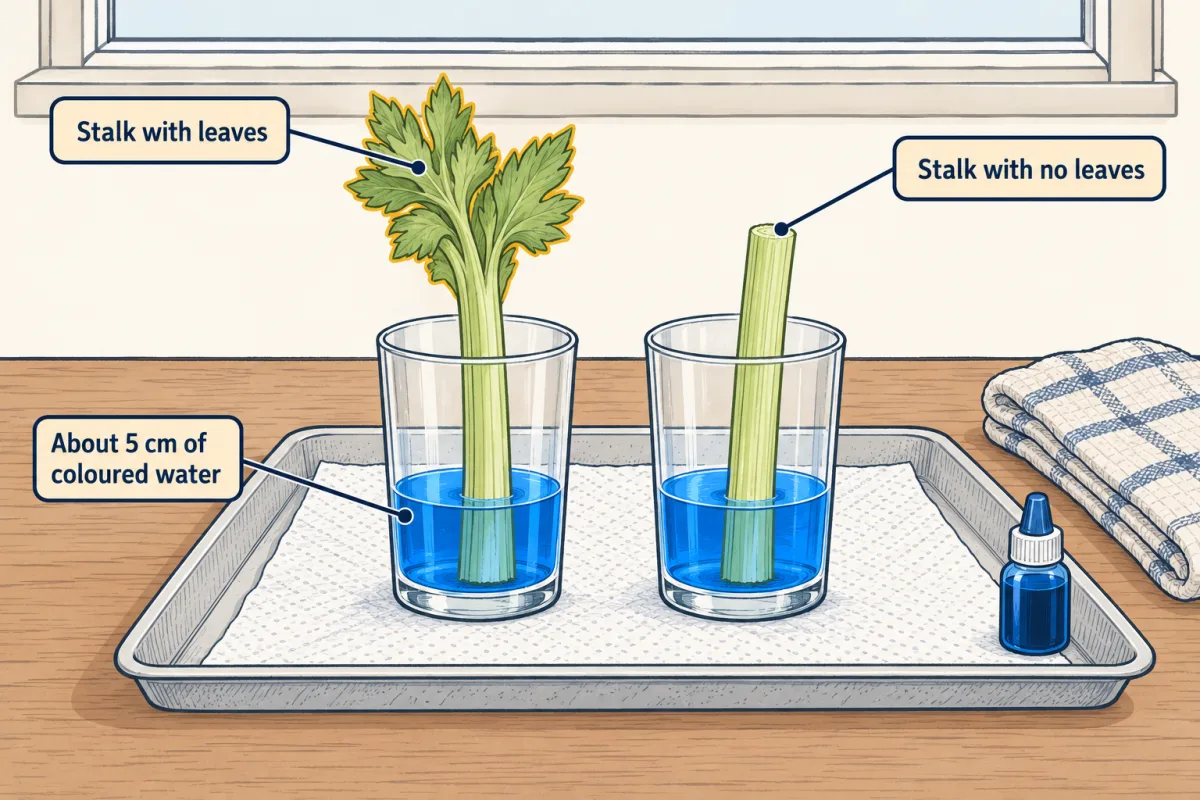
- Mix the colour. Fill each glass with about 5 cm of water. Stir in 15 to 20 drops of food colouring per glass. A dark colour is much easier to see.
- Fresh cut. You trim about 2 cm off the bottom of each stalk just before it goes in the water. A fresh cut takes up water well; a dried-out end is slow. From one stalk, also cut off all the leaves.
- Predict. Before the stalks go in, ask your child where the colour will go and how long it will take. Which stalk will change first, the one with leaves or the one without? Write or draw their guesses.
- Stand them up. Put one leafy stalk and the leafless stalk in two glasses of the same colour. Keep the third leafy stalk for the two-colour test in “Ages 8 to 10”, or add it as a spare. Put the glasses in a bright spot out of direct sun.
- Check after about 1 hour. Little may show yet. Look at the bottom of the stalk and the leaf edges, using the magnifying glass.
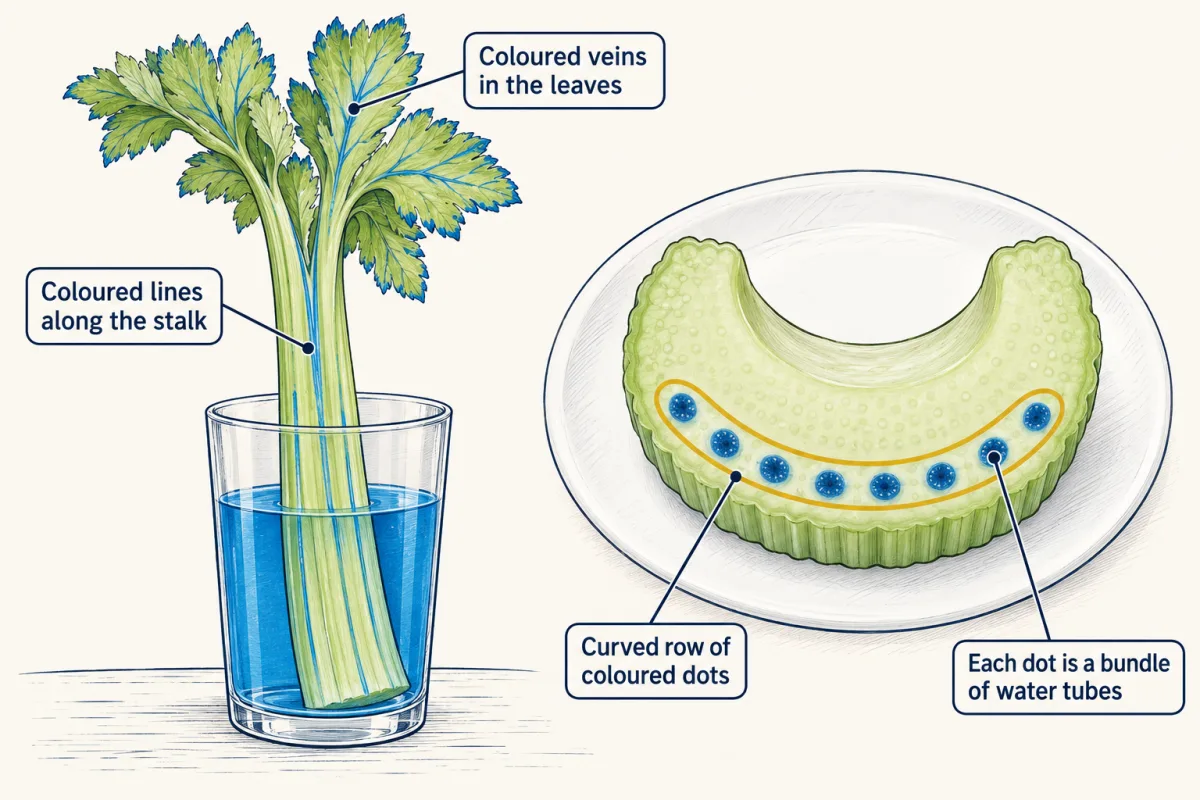
- Check after about 4 hours. Most often, coloured lines show along the ribs of the stalk and the leaf edges begin to colour. Compare the two stalks. Times vary with the room’s warmth, the light, how strong the dye is and how fresh the celery is.
- Check the next day. Overnight usually gives the clearest result, with coloured veins in the leaves. You cut across the stalk about 3 cm above the water. Look at the cut end: a curved row of coloured dots. Each dot is a bundle that holds water tubes.
- Peel a string. Snap a short piece of stalk and pull out one of the stringy strands. These strings are mostly tough support tissue that holds the stalk firm. A string may show colour where a bundle of water tubes came away with it; support tissue on its own usually stays paler.
Questions to ask while you do it
Ask your child to guess first, then check.
- “Where do you think the blue will show up first?”
- “I wonder if the stalk with no leaves will change as fast. Why or why not?”
- “What do you think we will see when we cut across the stalk?”
- “Where does a real celery plant get its water?”
- “What do you think would happen if we used two colours on one stalk?”
- “I wonder if a flower would do the same thing.”
What children often think
-
A child might say “The celery drinks with its leaves.”
You could try Ask where the colour is touching the plant. Only the cut bottom is in the water, and the colour shows there first. Water goes in at the bottom. The leaves are where water leaves the plant, as it dries off into the air.
-
A child might say “The stalk sucks it up like a straw.”
You could try Ask who does the sucking when you use a straw. Then compare the stalk with leaves to the one without. Most of the pull comes from water drying off the leaves, which tugs the water in the tubes upward.
-
A child might say “The colour will spread all through the stalk.”
You could try Cut across the stalk the next day and look. The colour sits in dots, not everywhere. Water travels in its own tubes, and the rest of the stalk stays mostly pale.
-
A child might say “Real plants don’t drink blue water, so this is a trick.”
You could try Agree that plants usually drink clear water. Ask what would happen if the water were clear. The water would still climb, but we could not see it. The colour just makes the path visible.
Why it works
The water tubes are part of a tissue called xylem. Many of its cells are long and hollow, and they die when mature, leaving open pipes joined end to end.
The pull comes mostly from the leaves. Water evaporates from inside the leaf and escapes through tiny pores called stomata. Water molecules cling to each other, so as some leave at the top, the whole thin column is drawn up behind them. This loss of water from leaves is called transpiration. Water also climbs a short way up very narrow tubes by itself, but that cannot explain how it reaches the top of a tall tree.
A stalk with no leaves has far fewer pores, so it usually colours more slowly. Celery varies, so treat this as a test, not a sure thing. The dots in a curved row are the stalk’s vascular bundles, which also carry sugar from the leaves in a second set of tubes. The tough “strings” of celery are mostly collenchyma, a living support tissue that runs in strands just under the skin, along the ribs.
Easier and harder
Ages 5 to 7
Use one leafy stalk in one colour and skip the leafless comparison. Check twice, after about 4 hours and the next morning. Your child draws the stalk each time and colours in where the blue has reached. Let them use the magnifying glass on the cut end and count the dots.
Ages 8 to 10
Keep the leaf comparison and add a split stalk. You cut up the middle of the bottom 8 to 10 cm of a leafy stalk. Stand one half in blue and the other in red, in two glasses side by side. Predict what the leaves will look like. Measure in centimetres how far the colour has climbed at each check and record it in a table.
If it doesn’t go as planned
If nothing shows after several hours, the dye may be too weak or the cut end may have dried. Add more colouring and have the adult trim a fresh 2 cm off the bottom. Old, limp celery can be slow, so use a crisp bunch. Yellow and green dyes are hard to see; blue and red work best. A cool room slows everything, so give it until the next day.
Observation sheet
Observation sheet
Thirsty celery
NameDate
Look at each stalk. Draw or write where the colour has reached.
| When | Stalk with leaves | Stalk with no leaves |
|---|---|---|
| About 1 hour | ||
| About 4 hours | ||
| Next day |
I think the colour will go:
What we saw:
biochemistrypedia.com · Biology Together
Finish line
Test yourself
4 questions
Practice and MCAT-style, with explained answers.
Next · Lesson 10
Leaf Detectives
How can you tell an oak from a maple without a label? A pile of fallen leaves and a few yes-or-no questions can do it.
Continue →