Biology Together · Unit 8: Virginia and Chesapeake nature
Roots Hold the Soil
You set up two sloped trays of soil, one bare and one covered in grass, and pour the same "rain" on both. Your child compares the runoff in two cups, first after a gentle rain and then after a storm. They find out that roots and leaves hold soil in place, then look for bare, washed-out spots outside and suggest a fix.
Watch first Set Up: Roots Hold the Soil · 0:45
Read the transcript of “Set Up: Roots Hold the Soil”
Film transcript: Set Up: Roots Hold the Soil
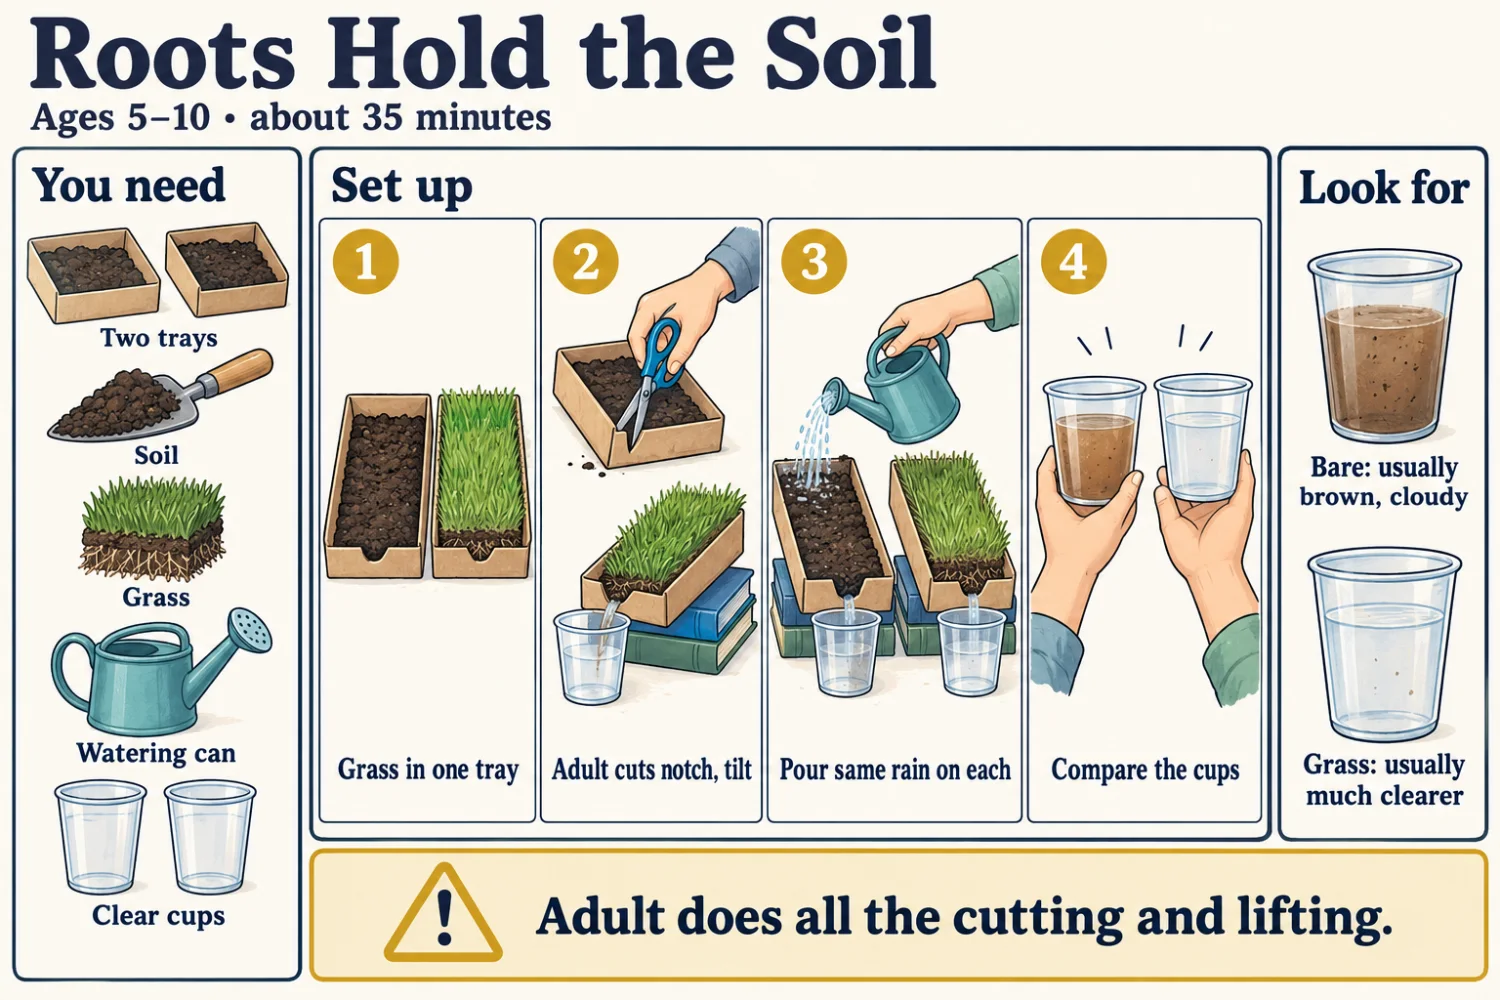
You need two matching containers, bagged topsoil, grass for one container, either sod or seed sown two to three weeks ahead, and two clear plastic cups. Fill both containers with the same soil, about five centimeters deep. One gets grass, from seed or sod. You cut a small notch at the low end of each. Raise the other ends on books. Pour two cups of water slowly over each tray. The cup from the bare tray is usually brown and cloudy. The cup from the grass tray is usually much clearer. Stay with your child the whole time. You do all the cutting, and you lift the wet trays, because they are heavy.
Before you start
- Hands-on time
- About 35 minutes, plus 2 to 3 weeks ahead to grow grass from seed, unless you use a piece of sod; and an optional walk after the next rain
- Where
- Outdoors
- Ages
- 5 to 10, with an easier and a harder version below
- Grown-up
- Stay with your child the whole time. You do all the cutting, and you lift the trays once they are wet.
What you need
- 2 matching containers: half-gallon milk or juice cartons laid on their sides with one long side cut away, or 2 small foil baking pans
- Bagged topsoil or garden soil, enough to fill each container about 5 cm (2 inches) deep
- Grass for one container: a piece of sod from a garden centre, or a handful of grass seed sown 2 to 3 weeks ahead
- Scissors or a craft knife (adult only)
- 2 clear plastic cups or jars (not glass) to catch the runoff
- A watering can, or a plastic cup with a few holes poked in the bottom
- A measuring cup
- Books, bricks or blocks to raise one end about 5 to 8 cm
- A ruler and a trowel or old spoon
Virginia science standards SOL 2.8 cSOL 2.7 bSOL 2.7 cSOL 3.8 cSOL 3.8 dSOL 4.8 d
The big idea
After a hard rain, look at a bare patch of dirt next to a lawn. The bare patch often has little channels and a fan of mud at the bottom. The grass beside it looks the same as before.
That difference is the whole activity. Rain and wind move soil from one place to another. This is called erosion. Plants slow it down. Leaves and stems catch falling drops before they hit the ground. Roots grip the soil and help water soak in instead of running off.
Erosion can be fast, like a flood or mudslide, or slow, like a beach wearing away a little each year. Soil forms very slowly, so it is worth keeping. Muddy runoff also carries soil into streams and, in much of Virginia, the Chesapeake Bay.
Virginia’s standards ask grade 2 children to model how plants reduce the effects of wind and water. Grade 3 and 4 children go further and plan ways to cut erosion in their schoolyard or neighbourhood.
What to do
- Grow the grass (2 to 3 weeks ahead). Fill one container with damp soil and sprinkle grass seed thickly on top. Perennial ryegrass is one of the fastest lawn grasses to sprout. Keep it moist in a sunny spot. Ryegrass usually sprouts in 3 to 10 days; some grasses, such as Kentucky bluegrass, can take up to a month. Or skip this step and press a piece of sod into the container on the day.
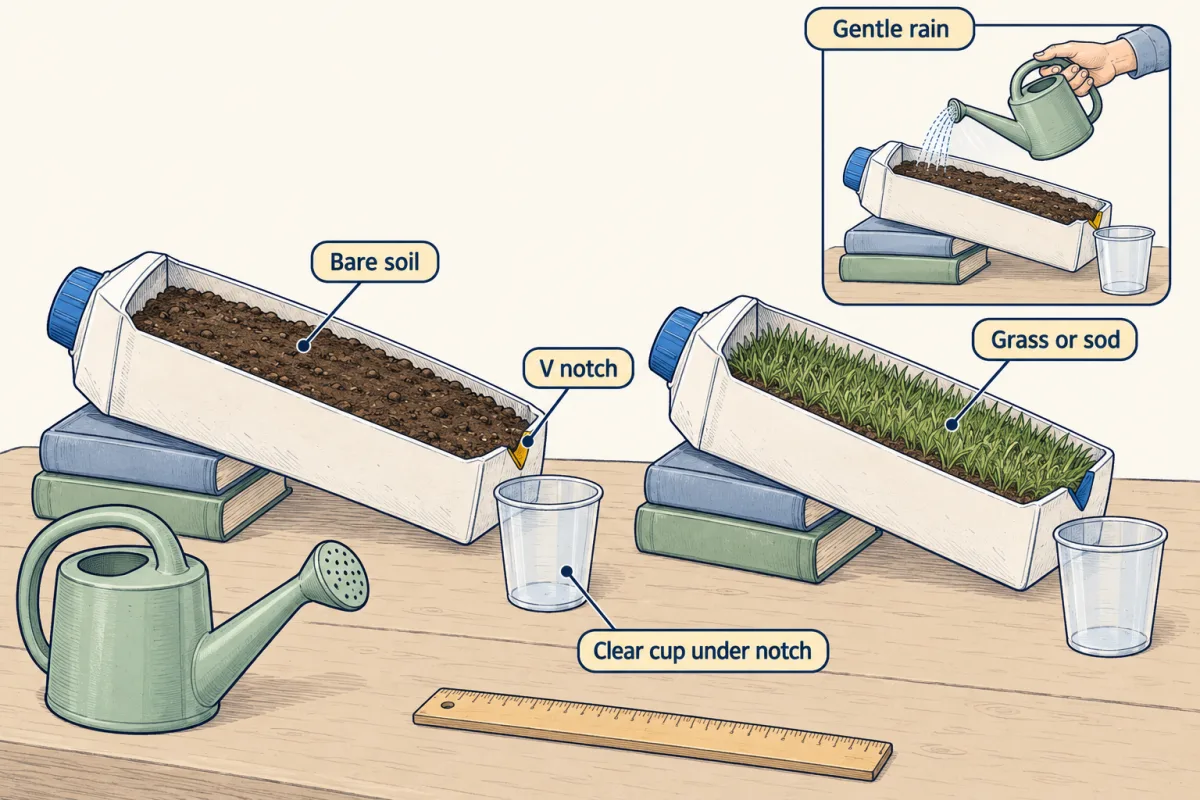
- Set up the slopes. Fill the second container with the same soil to the same depth, about 5 cm. You cut a small V notch at the low end of each container so water can pour out; a child does not use the scissors or craft knife. Set the notched end of each just over the edge of a table, step or low wall, and raise the other end on books, both to the same height. Set a clear cup below each notch.
- Predict. Ask your child, “Which cup will get more mud? Which will get more water?” Write both guesses down before any water is poured.
- Gentle rain. Measure 2 cups (about 500 mL) of water into the watering can. Pour it slowly over the high end of the bare tray, from about 20 cm up, over about 30 seconds. Do the same for the grass tray. Use the same amount, height and speed for both.
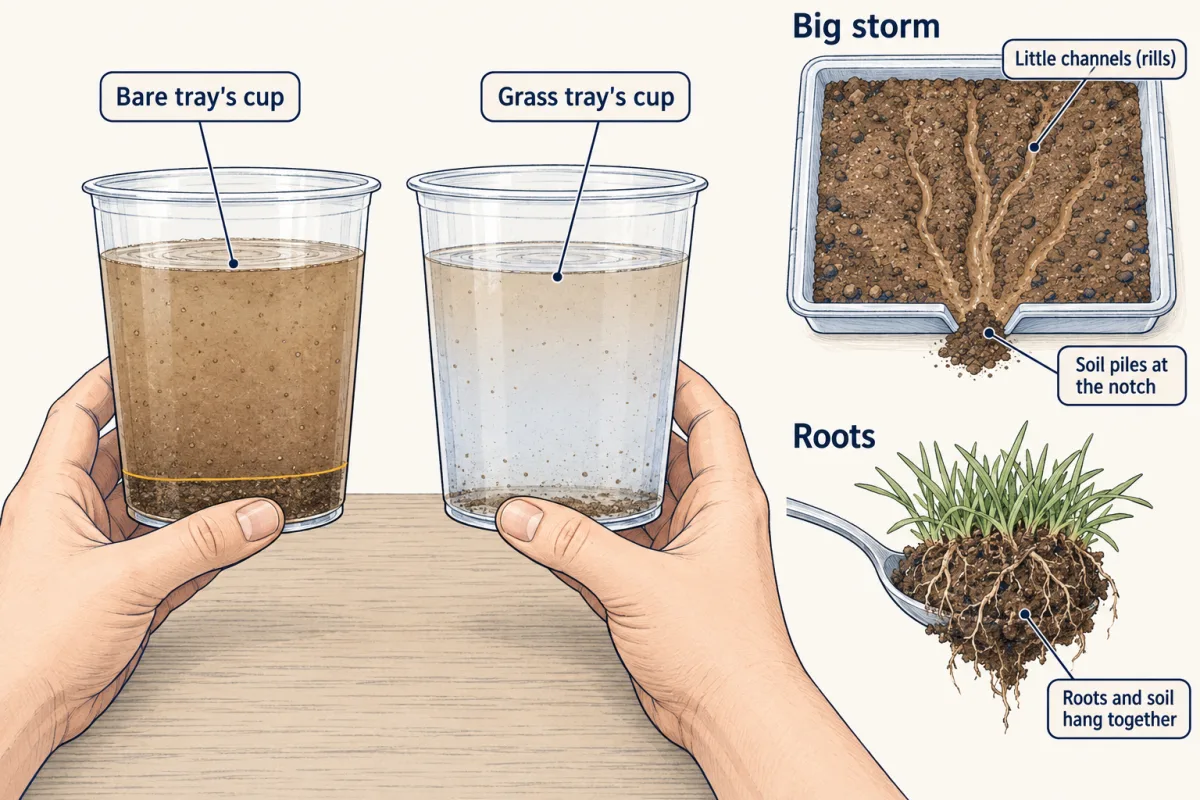
- Compare the cups. Hold both cups up to the light. The bare tray’s cup is usually brown and cloudy. The grass tray’s cup is usually much clearer, and often has less water in it. Let the cups sit 10 minutes, then measure the layer of soil on the bottom with a ruler.
- Big storm. Empty the cups. Pour 2 more cups onto each tray, this time in about 5 seconds. Look at the bare soil for little channels, called rills, and for soil piling up at the notch. Then let the cups sit 10 minutes and measure the soil layers again.
- Look at the roots. Lift one edge of the grass with a spoon. Look at how the roots and soil hang together in one clump.
- Erosion walk. After the next rain, walk around your yard, schoolyard or park. Find bare spots, gullies or mud washed onto a sidewalk. Ask your child how to fix each one: plant grass, spread mulch, or put down leaves.
Questions to ask while you do it
Ask your child to guess first, then check.
- “I wonder which cup will look muddier. Why do you think so?”
- “What do you think will happen if we pour much faster?”
- “Where did the soil in this cup come from?”
- “What do you think the roots are doing under the grass?”
- “If this muddy water ran into a creek, what might it do to the animals there?”
- “Where outside have you seen bare dirt? What could we plant there?”
What children often think
-
A child might say “The grass tray will make more mud because it has more stuff.”
You could try That is a fair guess, so test it. Write it down, pour, and hold the two cups side by side. Then lift the grass and look at the roots. Roots wrap around the soil and hold it in a clump.
-
A child might say “Rocks and dirt never move.”
You could try Ask where the mud in the cup came from a minute ago. Then look for sand on a sidewalk after rain or a muddy stream. Soil moves all the time, sometimes quickly in a storm and sometimes slowly over years.
-
A child might say “Rain only hurts the soil in big storms.”
You could try Look at the gentle-rain cup from the bare tray. Was there any soil in it? Small rains move a little soil each time. Over many rains, that adds up to a lot, which is why slow erosion matters too.
-
A child might say “The grass drinks up the mud.”
You could try Ask, "Did the mud go into the grass, or did it never leave the tray?" Lift the grass and look. The soil stayed in place because roots and leaves held it, not because the plants took it in.
Why it works
A falling raindrop hits bare soil hard enough to knock grains loose and splash them up. Loose grains then ride away in the thin sheet of water running downhill. Plant leaves and stems take the impact first, so the drops reach the soil more gently. Roots bind the soil together and leave small channels that help water soak in, so there is less runoff to carry soil away.
A faster pour moves more water across the surface at once, so it carries more soil and cuts rills. Farmers, road crews and stream restoration teams use the same idea when they plant cover crops, grass strips and trees along streams. Rows of trees called windbreaks slow the wind across fields and keep dry soil from blowing away. Soil forms slowly from rock and rotting plants: an inch of topsoil can take hundreds of years.
Easier and harder
Ages 5 to 7
Do only the gentle rain and the root look. Skip measuring. Ask your child to point to the muddier cup and tell you which tray it came from. Let them draw the two cups with crayons, one brown and one clear. On the walk, find one bare spot and one grassy spot and compare them.
Ages 8 to 10
Add a third tray covered with a layer of dead leaves or mulch, and keep everything else the same. Measure the water in each cup in mL and the soil layer in mm, and make a bar graph of the soil layers. Have your child write which tray lost the most soil and why. Then pick one bare spot at home or school, draw a plan to fix it, and check it after the next three rains.
If it doesn’t go as planned
If almost no water comes out of either tray, the soil was dry and soaked it all up. Water both trays the day before so they start equally damp. If the grass seed grew thin and patchy, the difference between the cups will be smaller; use sod or sow the seed more thickly. If water runs over the sides, make the V notch deeper or tip the trays less.
Observation sheet
Observation sheet
Roots hold the soil
NameDate
Pour the same rain on both trays. Look at each cup.
| Rain | Tray | Muddy or clear? | Soil in the bottom (mm) |
|---|---|---|---|
| Gentle rain | |||
| Gentle rain | |||
| Big storm | |||
| Big storm |
The tray that lost more soil was:
I think this happened because:
biochemistrypedia.com · Biology Together
Finish line
Test yourself
4 questions
Practice and MCAT-style, with explained answers.
Next · Lesson 30
Creek Critters
Is a creek just water? A strainer, a white tray and a few turned rocks show what lives in it.
Continue →