Biology Together · Unit 1: Alive and growing
Wake Up a Seed
You and your child put dry beans from the kitchen into two clear bags, one with a damp paper towel and one dry. Over one to two weeks your child predicts, checks and draws what happens. They find out that a dry seed is alive but resting, that water wakes it, and that the root comes out first.
Watch first Set Up: Wake Up a Seed · 0:41
Read the transcript of “Set Up: Wake Up a Seed”
Film transcript: Set Up: Wake Up a Seed
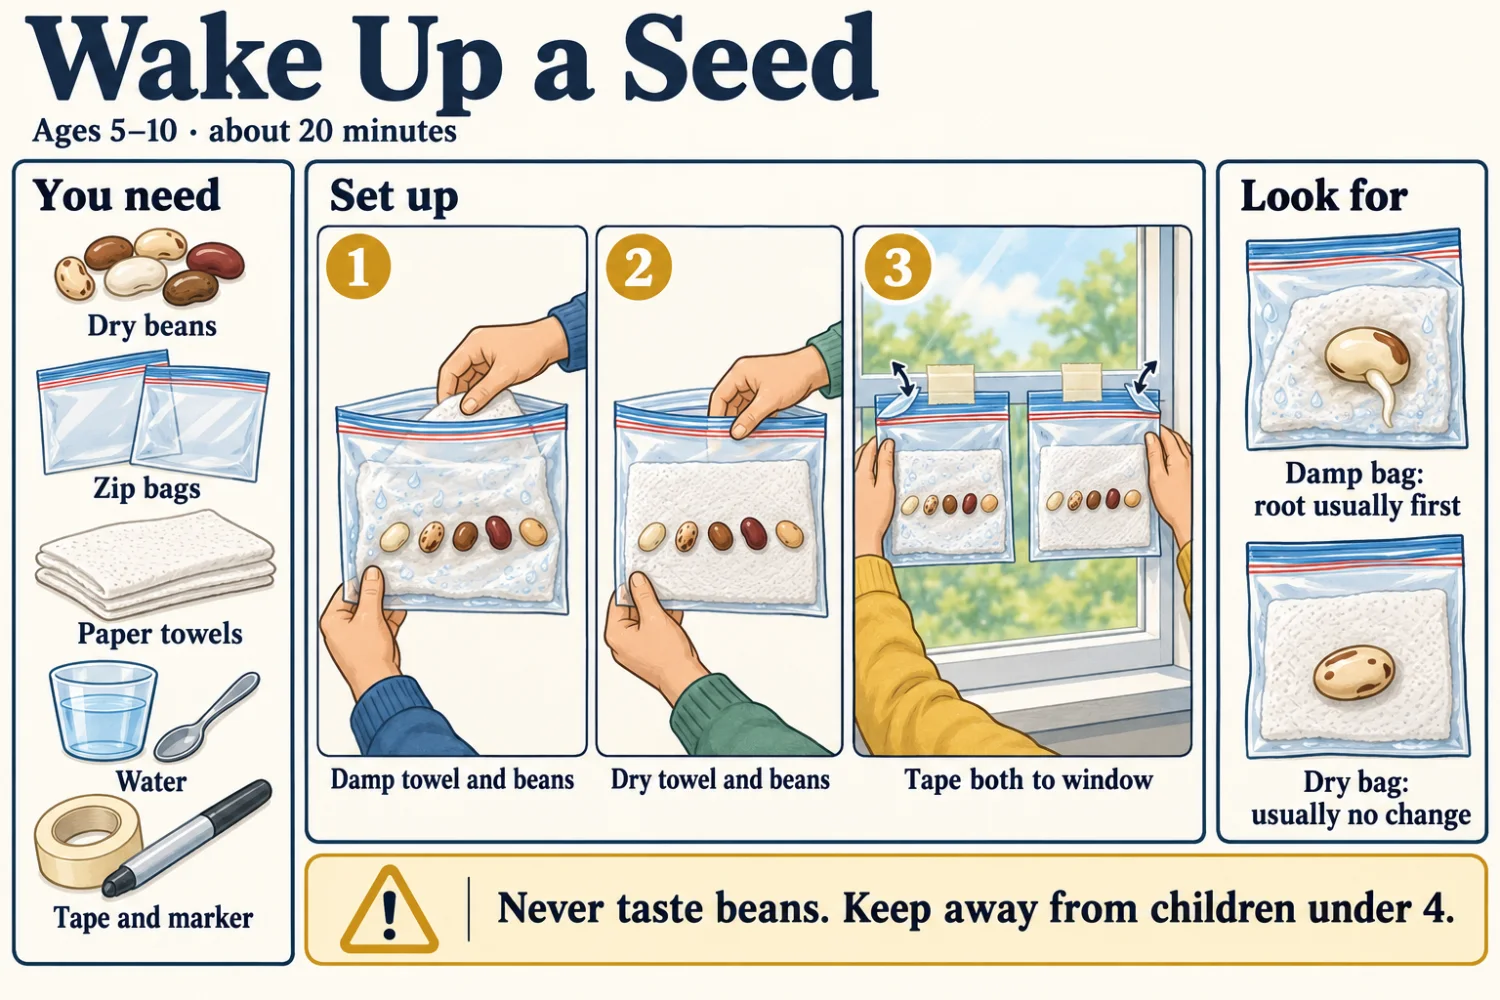
You need two clear zip bags, two paper towels, tape, a marker, and 12 to 20 large dry beans from the grocery store, such as lima or pinto. Fold a paper towel into each bag. Wet one until damp but not dripping. Set four to six beans on each towel. Close the bags almost all the way, and tape them to a bright window, away from hot sun. Check each day. In a warm room, a white root usually shows in three to seven days. Expect nothing in the dry bag. Stay with your child. Keep beans away from children under 4, Never taste a bean or sprout.
Before you start
- Hands-on time
- About 20 minutes, plus 2 or 3 minutes a day for one to two weeks
- Where
- Indoors
- Ages
- 5 to 10, with an easier and a harder version below
- Grown-up
- Stay with your child while the beans are out. You split the soaked bean, and you keep beans and bags away from children under 4.
What you need
- 12 to 20 large dry beans from the grocery store, such as lima (butter) beans, pinto beans or black beans
- 2 clear zip-top sandwich bags
- 2 paper towels
- Water in a small cup and a spoon
- Tape and a marker
- A small bowl of water for soaking one extra bean overnight (optional)
- A third bag and paper towel for a dark cupboard test (optional)
- A ruler (optional)
Virginia science standards SOL K.6 bSOL K.7 aSOL K.7 bSOL 2.4 bSOL 1.4 a
The big idea
A dry bean from the kitchen jar looks like a pebble. It does not grow, move or seem to need anything. Yet it is alive. It is resting: alive, but using almost none of its stored food. People often call this dormancy. Scientists call it quiescence, because the bean is only waiting for water. A truly dormant seed will not sprout even when it gets water and warmth.
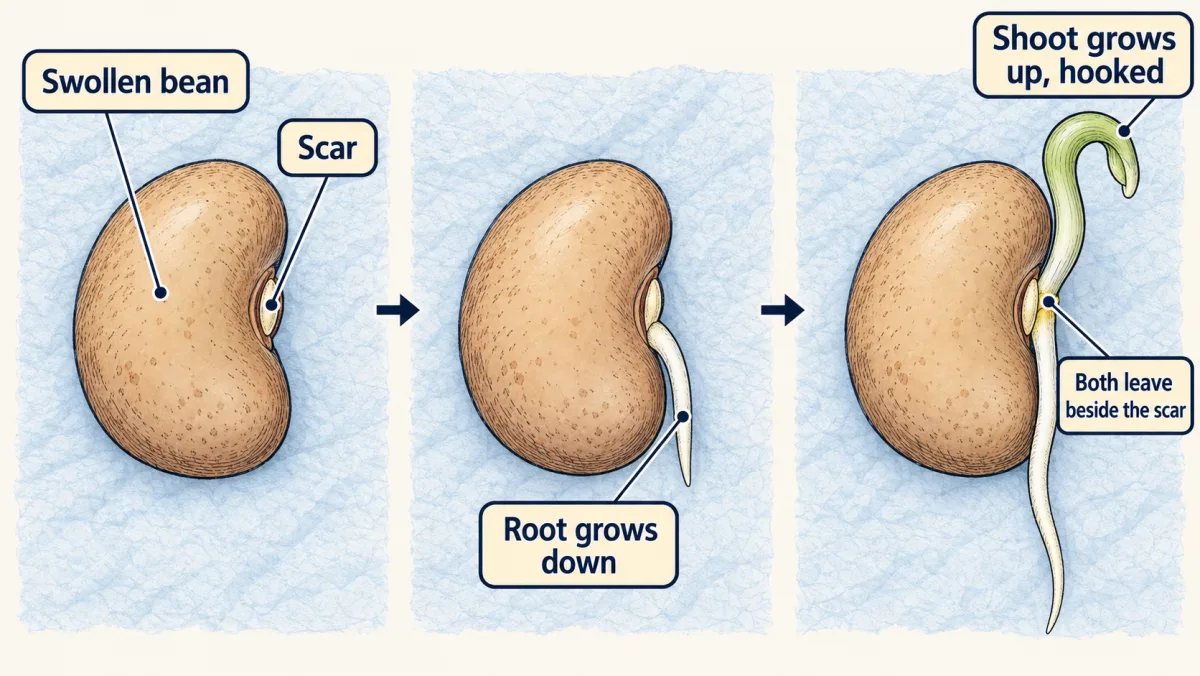
Inside each bean is a tiny plant and a large food store. Give the bean water and a warm room, and the tiny plant starts to grow. This start is called germination. A root comes out first and grows down. A shoot follows and grows up.
The activity puts two bags side by side, one damp and one dry. Only one thing differs, so your child can see that water is what wakes the seed. Checking each day also shows a plant’s first steps of growth, from seed to root to shoot. Virginia’s kindergarten standard asks children to notice changes like these. Naming every stage in order is a grade 2 goal.
What to do
- Look first. Give your child two dry beans. Ask, “Is this alive? How could we find out?” Write down their answer in their words.
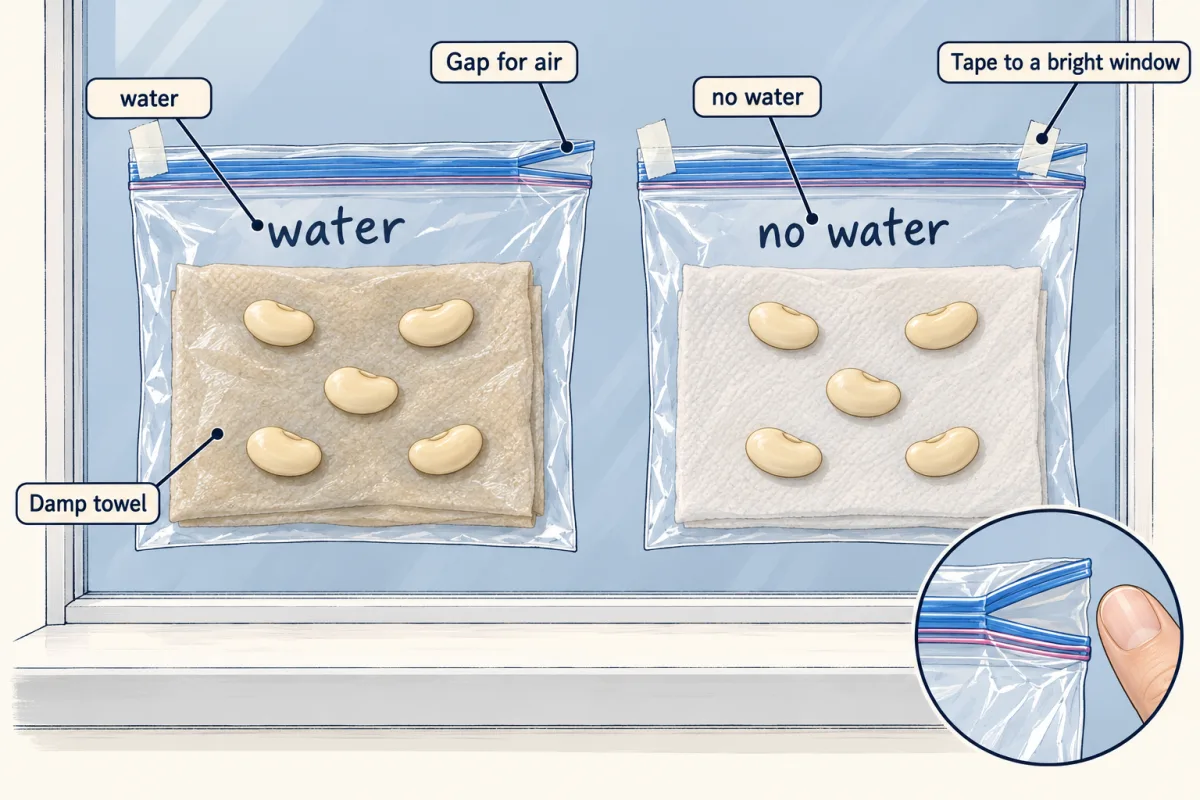
- Set up the bags. Fold a paper towel to fit inside a zip bag. Wet it with spoonfuls of water until it is damp but not dripping. Place 4 to 6 beans on it, about 2 cm apart, so you can see them through the plastic. Set up the second bag the same way with a dry towel. Label the bags “water” and “no water.”
- Predict. Ask, “What will happen in each bag? Where will something come out of the bean? Which way will it grow?” Have your child draw their guess.
- Place the bags. Close each bag almost all the way, leaving a gap about as wide as a finger for air. Tape both to a bright window that does not get hot afternoon sun, or lay them on a counter. A sealed bag in hot sun can get too warm.
- Check every day. Spend 2 or 3 minutes a day looking and drawing. Add a few drops of water if the towel starts to dry. In a warm room, most beans swell within a day and grow a white root in 3 to 7 days. In a cool room, it can take up to two weeks. The shoot, a curved stem, comes out a few days after the root. Expect nothing in the dry bag.
- Split a bean (optional). The night before you want to split it, soak one extra bean in a small bowl of water, out of reach of younger children, for 8 to 12 hours. Peel off its skin. You split it along the seam with a thumbnail. Look for the tiny plant tucked at one end, with a root tip and two folded leaves. The two thick halves are the food store.
- Add water to the dry bag. After about a week, ask, “What if we wet the dry bag now?” Wet its towel and keep checking. Most of those beans will start to grow too, which shows they were alive all along.
With a class, give each group of four one pair of bags and one daily checker.
Questions to ask while you do it
Ask your child to guess first, then check.
- “I wonder if this bean is alive. What could we do to find out?”
- “What do you think will happen in the dry bag?”
- “Where do you think the first part will come out? Will it grow up or down?”
- “What do you think will happen if we put one bag in a dark cupboard?”
- “The two bean halves are shrinking. Where do you think their food is going?”
- “What do you think will happen if this plant stays in the bag for a month?”
What children often think
-
A child might say “A bean is a little rock. It’s not alive.”
You could try Ask, "What would a rock do in a wet paper towel?" Put a small pebble in the damp bag next to the beans and watch both. The bean grows a root and the pebble does not. A dry seed is alive but resting.
-
A child might say “The plant grows out of the top of the bean.”
You could try Have your child draw where they think it will come out, then check each day. The root usually appears first, from a small spot near the scar on the bean’s side, and grows down. The shoot comes later and turns up.
-
A child might say “Seeds need sunlight to sprout.”
You could try Try it. Set up a third damp bag and put it in a dark cupboard. Beans usually sprout there too, just as they do under soil. Light matters once the shoot is up: its leaves need light to turn green and start making food before the store runs out.
-
A child might say “It will grow into a big bean plant right in the bag.”
You could try Ask, "What do big plants have that this bag doesn’t?" The bean’s stored food runs out after a week or two. To keep growing, the seedling needs light, plus water, nutrients and room for its roots, which a pot of soil can give. That is where the next activities pick up.
Why it works
A ripe seed dries out as it finishes growing on the parent plant. With little water inside, its cells slow almost to a stop. That lets many seeds wait months or years. A bean’s two thick halves are its seed leaves, also called cotyledons. They hold starch and protein for the young plant.
When the seed soaks up water, it swells and its cells start working again. Enzymes break down the stored food. The embryo’s root, the radicle, pushes out first, which anchors the seedling and takes up water. Then the shoot grows, often in a hook that later straightens.
Germination needs water, air and suitable warmth. Beans germinate best in soil around 65 to 85°F, and more slowly when cooler. Light is not needed to sprout, but the seedling needs it soon after the shoot comes up. In light its leaves turn green and start making food while the store is still being used. Not every grocery bean sprouts, because some are too old.
Easier and harder
Ages 5 to 7
Use one bean type and just the two bags. Let your child check every day but draw only every other day. Ask one question each time: “What is new?” Point to the root and say its name. Keep the word list short: seed, root, shoot, leaves. If waiting is hard, check twice a day for the first three days, when the beans swell fast.
Ages 8 to 10
Make it a fair test. Change one thing only, such as light (window bag and cupboard bag) or bean type (lima and pinto). Keep everything else the same. A damp bag in a closed cupboard is easy to forget, so look at it every day and follow the mold rule above. Measure the root in centimeters each day and record it in a table. Make a bar graph of day 7 root lengths. Afterward, have your child read their graph and explain what the test shows and what it does not.
If it doesn’t go as planned
If nothing happens after a week, the room may be too cool or the beans too old. Move the bags to a warmer spot and try fresh beans from another bag or store. If beans rot or turn slimy, germs are growing on them, often because the towel was too wet. Throw that bag away and use less water next time. If mold appears, press the bag shut and throw it away without opening it, then start again with fresh beans and a fresh towel. Some beans in every bag usually fail, so plant more than you need.
Observation sheet
Observation sheet
Wake up a seed
NameDate
Look at both bags each day. Draw or write what you see.
| Day | Bag with water | Bag with no water | Root length (cm) |
|---|---|---|---|
| Day 1 | |||
| Day 2 | |||
| Day 3 | |||
| Day 4 | |||
| Day 5 | |||
| Day 6 | |||
| Day 7 | |||
| Day 8 | |||
| Day 9 | |||
| Day 10 |
I think the first part to come out will be:
What happened in the bag with no water:
biochemistrypedia.com · Biology Together
Finish line
Test yourself
4 questions
Practice and MCAT-style, with explained answers.
Next · Lesson 3
Like Their Parents, Not the Same
Are all the peas in a pod the same? A ruler and a few vegetables help a child find out how offspring compare.
Continue →