Biology Together · Unit 7: Seasons and living things
Hidden Leaf Colors
You pull the colors out of green spinach leaves with rubbing alcohol, and a strip of coffee filter separates them as the liquid climbs. Your child finds out that a green leaf holds yellow color all summer, hidden under the green, which is why many leaves turn yellow in fall. Younger children do a version with no alcohol: rubbing leaves on paper and sorting fall leaves by color.
Watch first Set Up: Hidden Leaf Colors · 0:51
Read the transcript of “Set Up: Hidden Leaf Colors”
Film transcript: Set Up: Hidden Leaf Colors
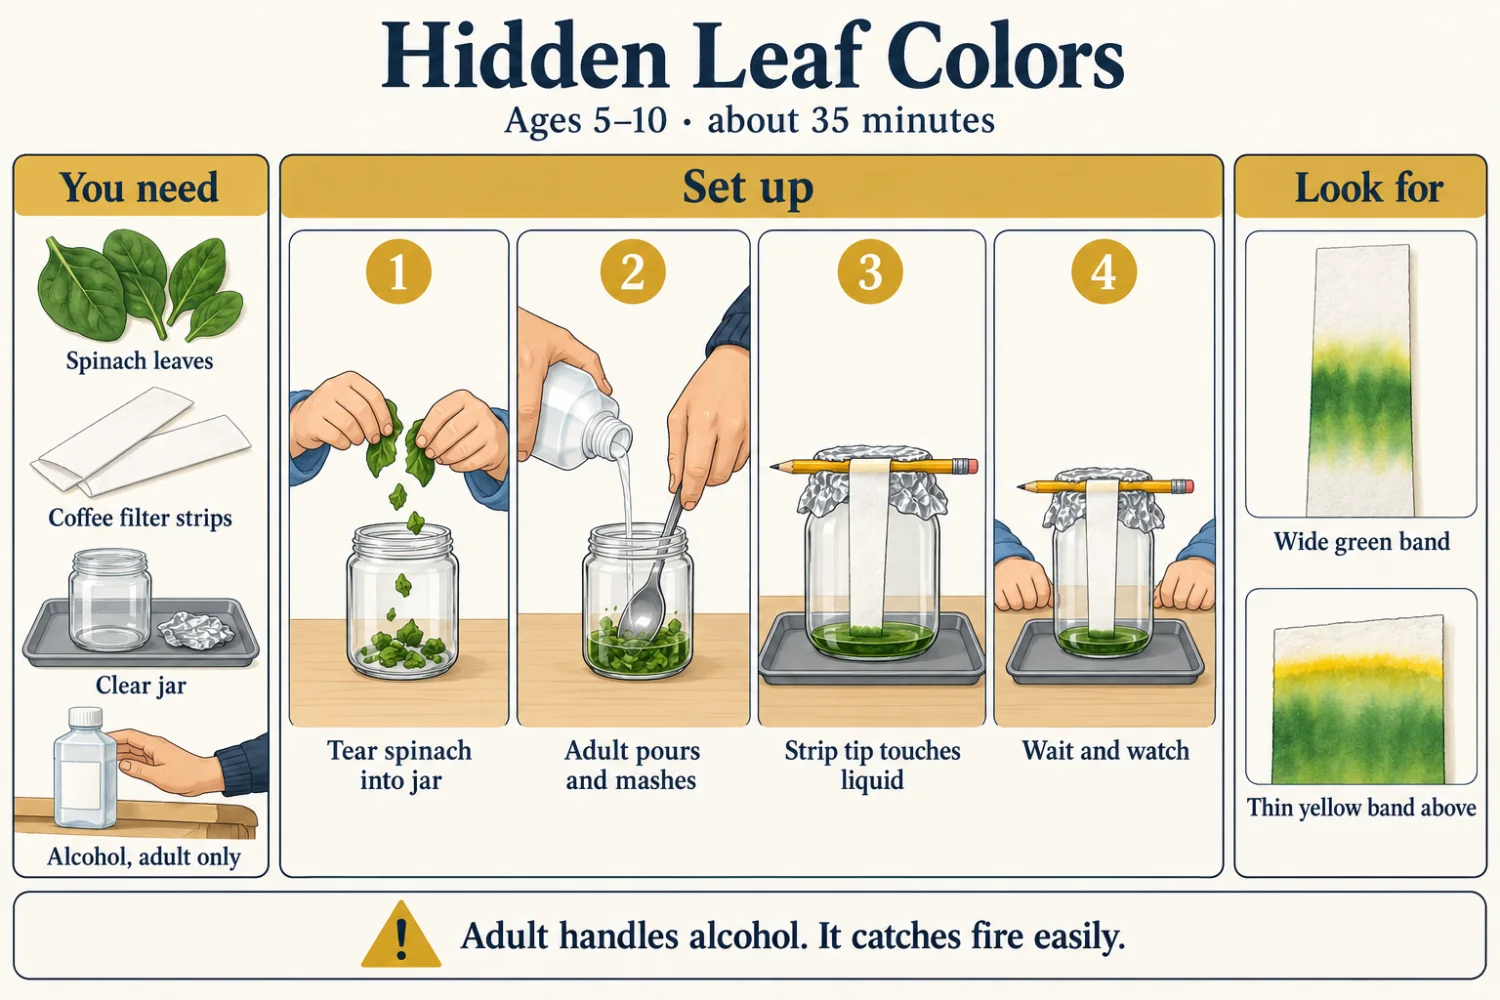
You need about ten spinach leaves, coffee filters, a glass jar with a lid that is never used for food again, and adult-only rubbing alcohol and safety glasses. Your child cuts filter strips and tears spinach. The adult pours alcohol and mashes. Cap the jar for fifteen to thirty minutes. Then the adult stands a strip in it. Colors climb the strip over thirty to ninety minutes. Expect a wide green band, and often a thin yellow band. The adult handles the rubbing alcohol from start to finish. It is poisonous to swallow and catches fire easily. Children look, never touch. Ages five to seven do leaf rubbing instead, with no alcohol.
Before you start
- Hands-on time
- About 35 minutes, plus 30 to 90 minutes of waiting while the colors climb the paper
- Where
- Indoors
- Ages
- 5 to 10, with an easier and a harder version below
- Grown-up
- The adult handles the rubbing alcohol from start to finish and stays in the room while the jar is out. Children aged 5 to 7 do the leaf-rubbing version, which uses no alcohol.
What you need
- A large handful of fresh spinach leaves (about 10 leaves), or other dark green leaves
- Rubbing alcohol (isopropyl alcohol), 70% or 91%, about 1/4 cup (60 mL), for the adult only
- Safety glasses or goggles for the adult
- A small clear glass jar with a lid that will never be used for food again, and a strip of masking tape to label it
- A metal spoon for mashing
- 2 or 3 white coffee filters
- Child-safe scissors, a pencil and clear tape
- A piece of foil to cover the jar, and a plate or tray
- For the leaf-rubbing version: white paper, a spoon, a few fresh green leaves and 5 to 10 fallen fall leaves of different colors
- Paper and a pencil, or the printed observation sheet below
Virginia science standards SOL 2.7 aSOL 4.2 a
The big idea
In fall, your child sees green leaves turn yellow, orange and red. It looks as if the tree is painting them. This activity shows that much of the color was there all along.
Green leaves are packed with chlorophyll, a green pigment (a colored substance) that plants use to catch light energy and make their own food. Leaves also hold yellow and orange pigments called carotenoids. They are there all summer, but there is so much green that it hides them.
In fall, shorter days and cooler weather signal the tree to stop making chlorophyll and break down what is left. The green fades and the yellows show through. Reds and purples work differently. Most of them are made new in the fall from sugars trapped in the leaf, so they were not hiding all summer.
Grade 2 links leaf color to seasonal change. Grade 4 asks children to know that plants use chlorophyll and sunlight to make food.
What to do
- Predict. Show your child a fresh green leaf and a yellow fall leaf. Ask, “Do you think there is any yellow hiding inside the green leaf?” Have them draw or write a guess.
- Cut the strips. Your child cuts 2 or 3 strips from coffee filters, about 2 cm wide and 12 to 15 cm long. Draw a pencil line across each strip, 2 cm from the bottom.
- Tear the leaves. Your child tears the spinach into bits about the size of a fingernail and drops them in the jar. Fill the jar about 2 to 3 cm deep with leaf bits.
- Add the alcohol (adult). Take the jar to your work spot, away from your child’s reach. Pour in just enough alcohol to cover the leaves, about 1/4 cup. Mash firmly but gently with the spoon for 2 to 3 minutes, so the glass does not crack. The liquid should turn dark green. Cap the jar and let it stand for 15 to 30 minutes, mashing once or twice more. Darker liquid gives clearer colors.
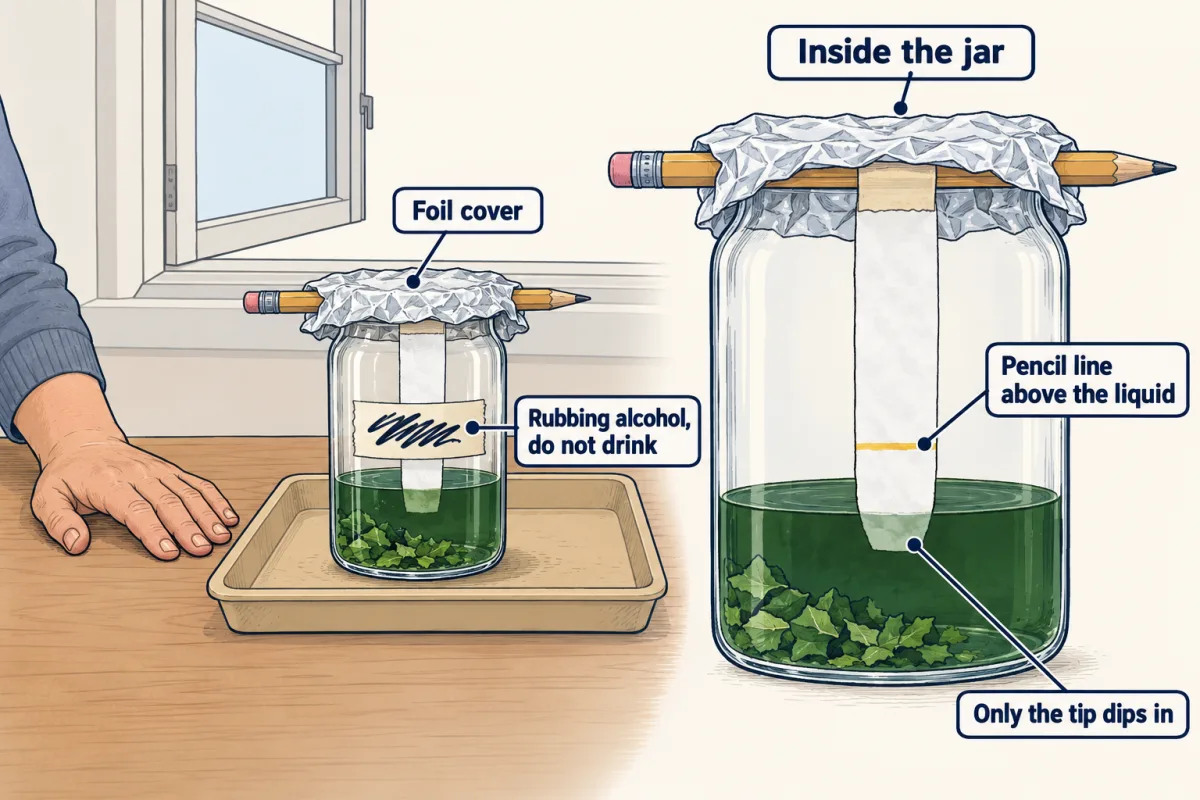
- Stand the strip (adult). Push the leaf bits to one side with the spoon. Tape the top of a strip to the pencil and lay the pencil across the jar mouth. Roll the strip around the pencil until only its tip dips into the liquid, with the pencil line just above the surface. Keep the strip off the sides of the jar. Cover the jar loosely with foil.
- Wait and watch. The liquid climbs the strip over 30 to 90 minutes. Check every 15 minutes, with the jar staying put on its tray and your child looking, not touching. Before each check, ask, “Which color do you think will climb highest?” Expect a wide green band. Above it, or along its top edge, you will often see a thin yellow or yellow-orange band.
- Dry and compare (adult). Lift out the strip and lay it on a plate to dry for a few minutes, away from flames. Then cap the jar and clean up as the safety notes say. Tape the dry strip next to a yellow fall leaf. Ask, “Where do you see the same yellow?”
Questions to ask while you do it
Ask your child to guess first, then check.
- “What colors do you think are hiding in this green leaf?”
- “I wonder which color will climb the paper fastest.”
- “What do you think would happen if we used a yellow fall leaf instead?”
- “If the yellow was there all summer, why couldn’t we see it?”
- “What do you think a red leaf would show on the strip?”
- “Why do you think the tree stops making green in the fall?”
What children often think
-
A child might say “Somebody paints the leaves in fall.”
You could try Ask, "Where do you think the color comes from?" Then look at the strip. The yellow came out of a green leaf that nobody painted. The colors are made by the leaf itself.
-
A child might say “The red was there all along, like the yellow.”
You could try That is a good guess, since the yellow was. Ask, "What do you think a red leaf shows on the strip?" Most red color is made new in fall from sugars trapped in the leaf, so it was not hiding all summer.
-
A child might say “Brown leaves are just dead and dirty.”
You could try Ask, "Is it dirt, or is the brown part of the leaf?" Rinse a brown oak leaf under running water and see if the brown washes off. Brown leaves, common on oaks, show substances called tannins after the green and yellow break down. The leaf is dead, but the brown is part of it.
-
A child might say “Frost makes the leaves change color.”
You could try Ask, "Did any leaves change color before the first frost?" Many do. Shorter days and cool nights start the change. Cool nights that stay above freezing help the reds. A frost can dull the colors, and a hard freeze can turn leaves brown and spoil the show.
Why it works
Paper chromatography separates a mixture by letting a liquid carry it up through paper. Each pigment dissolves in the alcohol and also sticks to the paper fibers to a different degree. Pigments that stick less travel farther, so the colors spread into bands. Results with a coffee filter vary, and the bands are often fuzzy rather than sharp.
Chlorophyll absorbs red and blue light and drives photosynthesis, making sugar from carbon dioxide and water. Carotenoids help catch light and protect chlorophyll from damage. In fall, as nights lengthen, the leaf starts to shut down. The tree stops making new chlorophyll and breaks down the old chlorophyll, pulling useful parts back into the branches. Some carotenoids last longer, so yellows appear. Later, a layer of cells at the base of the leaf stalk lets the leaf fall.
Red anthocyanins form in fall in some trees, such as red maples and dogwoods, when sugars build up in the leaf. Sunny days and cool nights help. Scientists think they shield the leaf while the tree pulls nutrients back, though this is still studied.
Easier and harder
Ages 5 to 7
Skip the alcohol. Fold a sheet of white paper over a fresh green leaf and rub hard with the back of a spoon until a green print soaks through. Do the same with a yellow and a red fall leaf. Compare the prints. Then sort 5 to 10 fallen leaves into piles by color and count each pile. Wash hands with soap afterward.
Ages 8 to 10
Run a fair test with one change. The adult still handles both jars and all the alcohol, as in the main version. Make two jars at the same time, one with green leaves and one with fall leaves from the same tree, using the same amount of leaf and alcohol. This uses about 1/2 cup of alcohol in all; label both jars and store and dispose of each one as the safety notes say. Measure in cm how far each color band climbs. Record the results in a table, then explain what the fall leaf has lost.
If it doesn’t go as planned
If you see only a green smear, the liquid was probably too weak. Use more leaves and less alcohol, and mash longer. If all the color washes to the top in one blur, the strip sat too deep; keep only the tip in the liquid. If you have 91% alcohol, try it; it may give clearer bands than 70%. It catches fire even more easily, so follow the same safety notes. Fall leaves give pale results, so use several.
Observation sheet
Observation sheet
Hidden leaf colors
NameDate
Draw the colors you see on your strip.
| Leaf | Color before | Colors on the strip |
|---|---|---|
| Green leaf | ||
| Fall leaf |
My guess before:
What I found:
biochemistrypedia.com · Biology Together
Finish line
Test yourself
4 questions
Practice and MCAT-style, with explained answers.
Next · Lesson 28
A Watershed in a Pan
Where does rain go after it lands on our street? A paper landscape and a spray bottle show the way downhill.
Continue →